
Technician’s Full Annual Cleaning Guide –AUSTROFLAMM Integra Free Standing & Insert Models
Caution: Turn off the stove and allow to cool. Once the stove has properly shut down and cooled,
unplug it before performing any cleaning or service.
Caution: Use only a certified ash vacuum to clean the stove. Using a regular home or shop vacuum
can result in a fire.
Caution: People with breathing problems should be careful to not inhale ash or dust during the
stove cleaning process. Use of a dust mask is recommended.
Caution: Even after allowing the stove to cool, hot embers may still be present in the firebox. Use
caution when you open the door and during the cleaning process. Use care, any remaining embers
can ignite clothing or objects close to the stove.
Caution: This cleaning guide is intended for Technician use only.
To maintain proper operation of any pellet stove, it is important to regularly clean the unit. Failure
to perform regular cleaning could lead to decreased performance, increased fuel consumption,
and an increased chance of a component failure. Component failures caused by lack of proper
cleaning are not covered under warranty.
This guide explains the recommended annual full service cleaning process. This process should
be performed no less than one time per year. More frequent full service cleanings may be
required depending upon the quality and quantity of fuel burned, vent configuration or in-home
conditions.
Component
Burn Pot
Ash Pan
Heat Exchanger area and Baffle Tubes
Exhaust Manifold
Primary Air Passages
Combustion Motor & Housing
Low-Limit Switch
Convection Motor
Air Sensor
Hopper and Auger Shaft
Tools Required
Small soft bristled brush
Metric socket set
6mm hex key wrench
Ash vacuum (see caution above)
Flat-tip screwdriver
Small putty knife
Hi-temp silicone and applicator
Drop cloth or other cover to protect floor
Flashlight
Rubber gloves (optional)
Dust mask (optional – see caution above)
Door, Burn Pot and Ash Pan
Spread a drop cloth or other suitable cover on the floor in front of and around the stove to
protect ash and debris from staining floors.
Open the door and vacuum out as much debris from the burn pot as possible. Clean the
door glass by wiping it with a dry paper towel or a dry, wadded up piece of newspaper. If
this fails, use any standard glass cleaner designed for use with wood stoves.
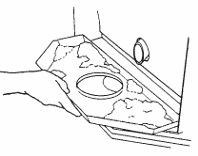
Clean out any remaining debris from the burn pot by lifting it out,
figure 1 figure 2
tipping it upside down, and tapping it on the ash pan (figure 1). If needed, use your flat-tip screwdriver to scrape away and loosen any remaining debris. Continue this process until all remaining ash debris is removed and all of the air holes in the burn pot are clear. Vacuum out the ash pan. Remove the ash pan and set it aside with the burn pot. (figure 2) Vacuum the area underneath where the burn pot sits. Using your brush and vacuum, clean the cast iron and gasket areas around the inside perimeter of the door.
Cast Iron Wall Plates
The back wall of the combustion area is made up of two cast iron plates that protect the heat
exchanger system from direct flame. If the area behind the cast iron plates is not periodically
cleaned, a complete blockage of the air paths can result. Sufficient blockage will cause the stove
to perform poorly and could result in a shut down .
Using a 6mm hex key wrench, remove the three screws securing the lower cast iron plate.
Once the screws are removed, the plate should pull away from the back of the stove.
Carefully lift the lower plate out and brush off any ash build-up from the front and back of
the plate.
Examine the lower plate’s gasket material for defect. Minor blemishes on the gasket are
acceptable, but replace the gasket if it’s broken or if pieces are missing. When finished,
set the plate aside.
Using the same 6mm hex key wrench, remove the two screws securing the upper cast iron
plate. It’s important to support the upper plate while the screws are being removed since
this plate is heavy and will fall if not supported.
Carefully lift the upper plate out and brush off any ash build-up from the front and back of
the plate. When finished, set the plate aside.
Heat Exchanger Area and Baffle Tubes
When you remove the two cast iron plates from the back of the combustion chamber, the entire heat exchanger system is exposed. You will be able to see the exchanger tubes as well as the scrapers that activate when the exchanger cleaning rods are pulled on the top of the stove. Vacuum the ash from the heat exchanger area, especially the area between the exchanger tubes. The soft brush and flat-tip screwdriver can be used to clean around and between the tubes. Clean out as much ash as possible (figure 3).
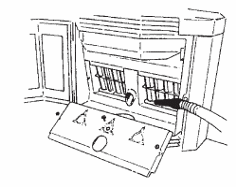
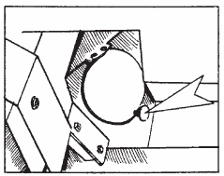
Figure 3 Figure 4
Carefully brush and clean the uppermost interior of the burn area.
Carefully brush and clean the grooves on the inside top of the fire box.
Do a final vacuum of the entire combustion area to remove any additional ash or debris.
Exhaust Manifold
For free standing models, remove the right and left side panels.. For insert models, pull the stove forward far enough to allow sufficient room to work comfortably. Remove the round exhaust manifold access plate by turning the thumb screw (figure 4). This may be a rectangular plate with four screws.
Thoroughly vacuum out all ash build-up as deep into the exhaust manifold as possible.
A long scraper contoured to fit the shape of the interior of the exhaust manifold wall was provided
with the stove. Use this scraper, to reach in and scrape out additional ash from the sides and
corners of the manifold.
Primary Air Passages
There are four air passages between the front of the exchanger area and the exhaust manifold.
These passages are the primary pathway from the combustion chamber to the combustion fan
and ventilation. If the passages become blocked, the stove will not burn efficiently and will exhibit
frequent errors and possible shutdown.
The passages are at the base of the exchanger area BEHIND the baffles. The passages are
rectangle shaped and are approximately 1” high by 2.5” wide. There are two on each side of the
exchanger.
The passages can be best seen by placing a flashlight inside the exhaust manifold (from the back
side of the stove) and then looking into the heat exchange / baffle tube area from the front of the
stove (while the lower cast wall is still removed). The holes should be clearly visible. If they are
not, this indicates a complete blockage.
Thoroughly clean these passages by passing a narrow, flat-tip screwdriver between the baffles or
by using the hooked end of the contoured scraper.
Combustion Motor
Using an 8mm socket, remove the four screws mounting the combustion motor to its housing (Figure 5). Examine and clean the motor, the housing, and the fan blades.
Note: Be careful not to bend or damage the fan blades.
Note: Use care to prevent damage to the combustion fan gasket. If the gasket does become
damaged during removal of the fan, the gasket will have to be replaced.
Note: Although not the most preferred method, if the combustion motor gasket does require
replacement but no gasket is available, a thin bead of hi-temp silicone can be used in place of the
gasket. Be careful not to apply too much silicone to the extent that it bleeds over and into the
actual exhaust pathway as this could potentially cause premature buildup of soot and interfere
with combustion fan operation.
Low Limit Switch
Carefully clean the low limit switch by reaching inside of the combustion fan housing with a damp
cloth and wiping off the flat surface of the switch. The switch can also be removed for easier
cleaning, but this would then require that the low-limit gasket be replaced upon reinstallation.
Convection Motor
Remove the two power leads from the motor, remove the four screws
mounting the convection fan to the stove (two screws on either side of the stove).
Remove the fan by pulling the motor out of the left side of the stove.
Note: The convection fan may appear to be stuck in place due to expanding and contracting
during normal use. A few very light taps on the right side metal housing of the fan should dislodge
it.
Note: There should be a thin piece of gasket material between the fastening sides of the fan
housing and the stove body. Be careful to save this material when you re-install the fan. If the fan
appears to vibrate after reassembly, this gasket material may have become dislodged and would
simply need to be placed back into position.
Air Sensor
On the right side of the stove, remove the two screws mounting the air sensor. Carefully remove
the sensor by pulling up and away from the air intake tube. Once removed, examine the probes
that extend into the air intake tube for debris or residue. Clean with a soft brush or cloth.
Note: If the residue will not come off with a soft brush or cloth, use an aerosol circuit board
cleaner.
Hopper
Remove the pellets from the Hopper. Using an 8mm socket, remove the six screws from the
auger shaft cover plate and pull out the plate.
Using a flat-tip screwdriver, scrape out any embedded pellet fines / dust residue from the auger
shaft.
Note: To ensure an adequate air seal upon reinstallation of the cover plate, clean away all of the
old gasket / silicone material from the hopper surface and the cover plate. Upon re-installation,
re-seal the plate by using a thin bead of high-temp silicone around the edges of the plate. Be
careful not to apply too much silicone to the extent that it bleeds over and into the actual auger
pathway as this could potentially cause a blockage in the shaft.
Reassembly
Reassemble in reverse order. While doing so, follow all cautions and guidelines in this document,
especially as they relate to any gasketting notes. Failure to sufficiently adhere or correctly
re-gasket any specific gasket point can result in an air leak, poor combustion, repetitive stove
error or shutdown, and possibly a house fire.
For specific consumer cleaning instructions please refer to the owner’s manual or the
document titled, “Integra Free Standing and Insert Cleaning Guide”.